With a few lines added to your WordPress theme’s style sheet you can transform boring widget titles into a smorgasbord of colors, small fonts, big fonts, backgrounds, borders - you name it. This post will show you how.
But please no flashing text (i.e. blinking text).
WordPress themes normally apply the same style to all of the widget titles within your sidebars.

With some additional entries to your theme’s style sheet, you can give each widget title its own unique appearance, transforming the (boring) version above to:

How do you add entries to your theme’s style sheet?
It’s as easy as 1, 2, 3 & 4.
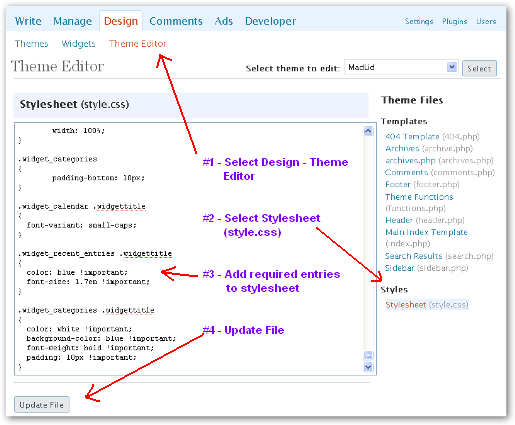
When adding entries to your theme’s style sheet, it is best to add them after the existing content.
The style sheet entries used to achieve the above are:
.widget_recent_entries .widgettitle
{
color: blue !important;
font-size: 1.7em !important;
}
.widget_categories .widgettitle
{
color: white !important;
background-color: blue !important;
font-weight: bold !important;
padding: 10px !important;
}
.widget_pages .widgettitle
{
border-bottom: 2px solid black !important;
}
.widget_calendar .widgettitle
{
font-variant: small-caps !important;
}
So how does this work.
When a widget is rendered to HTML, it is done so using the following format:
<li id="widget-id" class="widget widget-specific-style">
<h2 class="widgettitle">Widget Title Text</h2>
...
</li>
Each widget has its own unique ID and class specific style, as well as the generic ‘widget’ class.
If we look at the recent posts widget, we see:
<li id="recent-posts" class="widget widget_recent_entries">
<h2 class="widgettitle">Recent Posts</h2>
...
</li>
So we can style any ‘widgettitle’ classed item which follows a ‘widget_recent_entries’ classed item as is our want.
So to achieve our pimped version, we added the following:
.widget_recent_entries .widgettitle
{
color: blue !important;
font-size: 1.7em !important;
}
The period character (.) before the names ‘.widget_recent_entries’ and ‘widgettitle’ is critical since this is used to denote a class name.
You will note the use of “!important” which forces that specific setting to be used. If this was not used, then the entry may be overridden due to the rules used to determine the precedence of style sheet entries.
Now consider the categories widget, we see:
<li id="categories-227973261" class="widget widget_categories">
<h2 class="widgettitle">Categories</h2>
...
</li>
So to pimp the categories title we add the following:
.widget_categories .widgettitle
{
color: white !important;
background-color: blue !important;
font-weight: bold !important;
padding: 10px !important;
}
Now the categories HTML is slightly different to the recent posts widget in that the ID is qualified by a number, 227973261 in this case. The recent posts widget can only be used the once in your sidebars, whereas the categories can be used multiple times, and the ID, which is automatically generated by WordPress, uniquely identifies that instance of the widget.
Using the class name within the style sheet will cause all widgets with the same class to be affected. So if we added another Categories widget to the sidebar, its title will be styled the same.
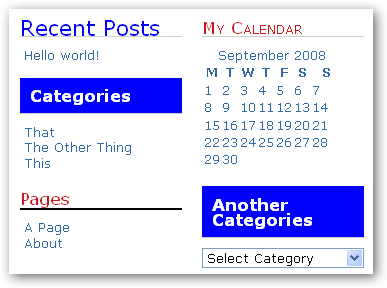
How can you pimp the category titles differently? I’m glad you asked.
If we look at the page source we will see that the categories widgets are rendered as:
<li id="categories-227973261" class="widget widget_categories">
<h2 class="widgettitle">Categories</h2>
...
</li>

<li id="categories-234397751" class="widget widget_categories">
<h2 class="widgettitle">Another Categories</h2>
...
</li>
We target individual category widget instances by using the widget ID instead of its class, so the style sheet entries become:
#categories-227973261 .widgettitle
{
color: white !important;
background-color: blue !important;
font-weight: bold !important;
padding: 10px !important;
}
#categories-234397751 .widgettitle
{
color: white !important;
background-color: red !important;
font-weight: bold !important;
padding: 10px !important;
}
The hash character (#) is used to denote an ID of an item within the page. So, we are styling any item which has a class of ‘widgettitle’ which follows any item with an ID of ‘categories-227973261 or ‘categories-234397751′.
So now our sidebar looks like this:
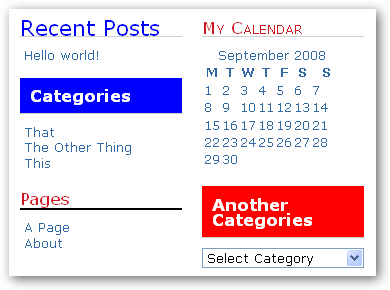
Whilst the widget appears within your sidebar, the ID will not change. However, if the widget is deleted and then recreated, the ID will change. So any existing ID based style sheet entries will no longer have any affect.
I would save the original theme’s style sheet and also record any changes you make to this file. This will allow you to easily identify what changes you have made and why, so if your theme is updated, which will replace the contents of the style sheet within the theme, you can easily remake your required changes.
Have fun pimping your widget titles!
This post was inspired by a comment posted on our Simple Image Link Plugin page. The original comment is here and my response here.
Sphere: Related Content

 Add to Delicious
 Digg This!
 Stumble This!
 Mixx This!
 Sphinn This!



 Add to Technorati

MAD, great post, I am very glad to see you guys taking my advice about creating posts of how to do things, especially HTML stuff. You know I am completely lost when it comes to all that stuff. Great job!!
THANK YOU! I was about to scream till I found this!
Cheers!
I made with photoshop anime myspace pictures.
take a look at them:
http://tinyurl.com/5w2eqc
Thank you for your website xxoxo
xxoxo