July brought with it many great posts to help new bloggers blog well.

Here are my favorites, broken down by category – please enjoy!

Attracting Visitors To Your Blog

21 Ways To Make Your Blog or Website Sticky

A sticky website is one where a first time reader arrives and finds it difficult to leave – not because you hijack them and make them stay, but because you’ve created a place they want to get to know better. Darren describes what’s worked for him and encourages you to do the same.

How To Kill Conversation and Suck the Life Out Of Your Blog

New bloggers, sometimes even seasoned bloggers, make daily decisions that result in either the growth of their community or its demise. If your visitors are not coming back, or not interacting with you, you might want to reconsider your commenting policy.

12 Common Blogging Mistakes to Avoid

Jeff walks us through the most common reasons why blogs fail, and shows you how to avoid them. In this post he talks about the importance of having bite sized, scannable content, the problems with advertising within blog posts, how to establish trust and credibility, the importance of images, and much more.

5 Ways To Increase Comments On Your Blog

You want your blog to be successful? You’ve got to interact with your visitors. But what if people aren’t commenting? Here, David highlights the five most successful methods for increasing comments on your blog.

3 Types of Blogs That Totally Suck

“Anchor text spam”, “Trick me into clicking,” and “You mean I need to know how to write to be a blogger,” are three types of blogs that suck according to Jill. In this post she describes each and encourages you to look at your blog with fresh eyes.

Make your blog findable by search engines

Top Ten Fatal URL Design Mistakes

A bad URL means your blog/post won’t be found, clicked, visited and linked, or submitted to social media. Without proper URLs, most of your other great web design, usability and SEO measures get wasted. This is not about your domain name; you need to understand slugs too; Tad explains them.

How To Get Google To Love You

Two things you need to consider when thinking about how Google sees your blog; on page factors, and off page factors. In this post, Ken walks you through the importance of considering the elements that make up each factor.

via: The SEO Company

Online SEO Tools – The Ultimate Collection

Ann offers over 60 free online tools to help you optimize or analyze your site. Includes sections on; backlink analysis, keyword research, domain name tools, on site analysis and diagnosis, and website traffic and demographic resources. Bookmark this post!

How To Get New Sites To Rank Quickly

The main difference between a low ranked site and a top ranked site is often site age. But what if you’re a new site that has to compete with sites that have been around for a few years? Aaron gives you seven strategies explaining what you need to do to rank quickly.

How do you know you got a Google PageRank update?

This post walks you through the basics of PageRank and shows you where to check your PageRank if you don’t have the Google Toolbar plugin. Of course, if you did have the plugin, you would be able to see the PageRank of every site you visit in a little box on your browser.

via: ProTycoon

Find Out When Google First Indexed Your Site

If you think Google discovered your site when you launched it, there is a good chance that you wrong. Mani shows you a quick trick to help you determine your Google birthday.

Nurturing and Growing Your blog

What Do You Expect From Your Blog?

Why do you blog? Is it because you enjoy expressing yourself through writing? Maybe it’s to promote a business or service? Are you just trying to make a quick buck? In this post, Jeff breaks down the different types of blogs and offers insight into what you can expect from each.

How to Analyze and Improve Your Bounce Rate

The ‘bounce rate’ is the percentage of visitors who leave your site shortly after arriving; without taking the time to explore your site further. As such, a low bounce rate is the goal. A high bounce rate, however, needs to be addressed. In this post, Maki shows you how to measure your bounce rate, and offers suggestions on how to improve your bounce rate.

7 Things To Do While Not Blogging

If you think blogging is just about writing up posts and crossing your fingers that visitors will come, you’ll be in for a disappointment. You need to look after your site, interact with other bloggers, and plan for the future; Greg shows you how in this post.

Permission Marketing Revisited

A brief background about word of mouth marketing and a reminder that your marketing, in order to be effective, must be permission based. Valeria gives you nine tips.

Factors Affecting The Look Of Your Blog

Effective Use of Blog Sidebars

Steven discusses the value and purpose of the sidebar and what it needs to accomplish. He then points you to great examples of sidebars being used. Read this post for inspiration.

A Small Study Of Big Blogs

Part 1 and Part 2

In this two part series, Smashing Magazine evaluates what the big players are doing (or not doing) with their blogs and offers suggestions on how to create an effective blog design. Part one of the study looks at layout and typography, part two looks at structure, advertisements, and functionality

50+ More Free RSS Feed Icons

Every blog wants as many subscribers as it can get. Attracting readers with a noticeable RSS icon is one way of achieving that goal. In this post, Michael adds 50 free wicked looking RSS icons to his original 60 free icons list.

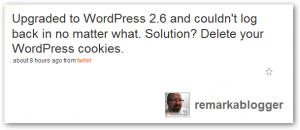
Cant Log In To WordPress V2.6?


Thanks Remarkablogger

via Twitter

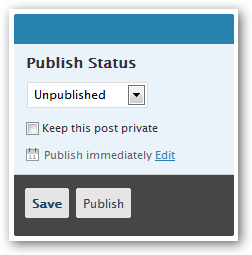
If you’ve ever wanted to publish a specific post on a particular day in the future, it’s very simple to do if you’re using WordPress.

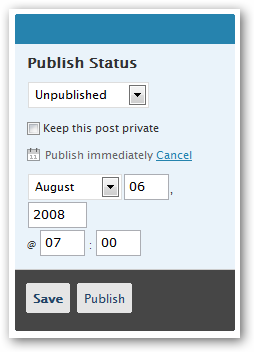
Once you have written your post, instead of hitting the save or publish button, click the edit button next to publish immediately.

This will open up other options (see image below).  Select the month, date, and time when you’d like your post published, and press the publish button.

Don’t make the common mistake of pressing save.   While save seems to make more sense, it is in fact the incorrect button to press. Hit publish instead, and on the time and date you’ve set, WordPress will automatically publish your post.

See?  Easy!

Not long ago, we put together a basic list of Firefox keyboard shortcuts. Today, we thought we’d give you 22 useful and basic IE keyboard shortcuts to print up or bookmark.

  1. Select location bar: Alt+D
  2. Select search bar: Ctrl+E
  3. Open search result in new tab: Alt+Enter
  4. Full screen on/off: F11
  5. Go to your default homepage: Alt+Home
  6. Go back a page: Alt+Left Arrow or Backspace
  7. Go forward a page: Alt+Right Arrow, or Shift+Backspace
  8. Select an entire page: (ready to copy and paste) Ctrl+A
  9. Copy selected text: Ctrl+C
  10. Paste to new location: Ctrl+V
  11. Refresh page: F5
  12. Refresh page and cache: Ctrl+F5
  13. Stop downloading page: Esc
  14. Open New Tab: Ctrl+T
  15. Switch to next tab: Ctrl+Tab
  16. Switch to previous tab: Ctrl+Shift+Tab
  17. View Page Source: Alt+V+C
  18. Find specific words on a page: Ctrl+F
  19. Print Page: Ctrl+P
  20. Save Page: Ctrl+S
  21. Zoom in (Increase text size): Ctrl++
  22. Zoom out (Decrease text size): Ctrl+-

Photo Credit: ieteam

You may have seen this symbol  next to links on various pages of the Web. It denotes that the link (which is usually placed before the symbol) is an external link.

If you’ve ever wanted to differentiate internal links from external links on your blog, there is a fairly simple way of doing it, and all it requires is a few lines of text added to your stylesheet.

In this post, we’ll show you how to do it.

Why differentiate between internal and external links?

Today, most people scan, they don’t read the full text of a blog. By representing your external links visually, visitors can see – at a glance – that you’ve given them quick access to relevant and related content that is not solely on your site. This is significant because the easier you make it for your visitors; the more information you supply, the more likely they are to subscribe to your RSS feed, or return to your site next time around.

How to differentiate between internal and external links on your blog

You won’t need to change anything on your existing posts; you’ll just need to make a few small changes to your style sheet.

This change will automatically update every post you have ever written.

Step 1: Copy the ‘external’ Image File

You need to copy the image file, external.gif, to the images sub-folder within your current WordPress theme folder.

Step 2: Add ‘external’ Image to Links

To create links that appear within posts as:

Add the following to your style sheet:

a
{
  background: url(/page/9/images/external.gif) no-repeat right top;
  padding-right: 12px;
}
 

The right padding value of 12 pixels ensures that the image does not overlap the text of the link.

Step 3: Differentiate Between Relative and Absolute Links

A handy feature of CSS is that you can apply a style not only to a HTML tag, but optionally based on the contents of any of the HTML tag’s attributes.

For example, to apply the above style to only those link references which contain “http:”, you modify the style sheet entries as follows:

a[href^="http:"]
{
  background: url(/page/9/images/external.gif) no-repeat right top;
  padding-right: 12px;
}
 

But this is only useful, if links to other posts are relative and not absolute links. An example of a relative link is ‘<a href=”another-post”>…</a>‘; whereas, an absolute link is ‘<a href=”http://blog.example.com/another-post”>…</a>‘.

Step 4: Exclude Absolute Links to Your Blog or Web Site

Now WordPress always uses absolute links. So to ensure that any link to your own blog or Web site does not have the external image applied, you follow the above style with entries which undo this change. The entries are specific to domain name of the blog or Web site.

For BlogWell, all our links start with http://blog-well.com. You will need to replace “http://blog-well.com” in the entries below with the domain name of your blog or Web site:

a[href^="http:"]
{
  background: url(/page/9/images/external.gif) no-repeat right top;
  padding-right: 12px;
}
a[href^=http://blog-well.com]
{
  background: none;
  padding-right: 0px;
} 

Step 5: Add a Class to Exclude the ‘external’ Image

Sometimes you may want some links which go outside of your blog or Web site to not have the external image applied. You can do this on a case by case basis by using a link class of ‘noexternallink’. Within your post you would write the link as:

<a class='noexternallink' href='http://example.com'>Example</a>

And the style sheet would contain:

a[href^="http:"]
{
  background: url(/page/9/images/external.gif) no-repeat right top;
  padding-right: 12px;
}
a.noexternallink[href^="http:"],
a[href^=http://blog-well.com]
{
  background: none;
  padding-right: 0px;
}

Note than ‘a.noexternallink[href^="http:"]‘ and ‘a[href^="/index.html"]‘ are separated by a comma. This is very important, since it ensures that the background of none and right padding of 0 pixels are applied to both ‘a.noexternallink[href^="http:"]‘ and ‘a[href^="/index.html"]‘. If you forget the comma, then it will only be applied, should ‘a[href^="/index.html"]‘ follow a ‘a.noexternallink[href^="http:"]‘.

Step 6: Exclude ‘external’ Image from Header and Footer Items

Within BlogWell’s theme we did not want any links within the header or footer to use the external image. Our theme uses the DIV HTML tag to identify the header and footer, and use the ID values of ‘header’ and ‘footer’ for each respectively.

<div id='header'>
...
</div>
...
<div id='footer'>
...
</div>

Without having to change all the links within the header and footer to use the ‘noexternallink’ class for links, we can easily prevent any links within the header and footer DIVs by using the following:

a[href^="http:"]
{
  background: url(/page/9/images/external.gif) no-repeat right top;
  padding-right: 12px;
}
#header a[href^="http:"],
#footer a[href^="http:"],
a.noexternallink[href^="http:"],
a[href^=http://blog-well.com]
{
  background: none;
  padding-right: 0px;
}

Step 7: Exclude ‘external’ Image from Sidebar Items

If you didn’t want the external image to be applied to any links within any of the sidebars, you can do the following:

a[href^="http:"]
{
  background: url(/page/9/images/external.gif) no-repeat right top;
  padding-right: 12px;
}
#header a[href^="http:"],
#footer a[href^="http:"],
#sidebar a[href^="http:"],
a.noexternallink[href^="http:"],
a[href^=http://blog-well.com]
{
  background: none;
  padding-right: 0px;
}

Step 8: Include Both Normal and Secure HTTP Links

If you use Secure HTTP, then your links will start with “https:”. To handle either standard HTTP (http://) or Secure HTTP (https://), then the above style sheet entries would be:

a[href^="http:"], a[href^="https:"]
{
  background: url(/page/9/images/external.gif) no-repeat right top;
  padding-right: 12px;
}
#header a[href^="http:"], #header a[href^="https:"],
#footer a[href^="http:"], #footer a[href^="https:"],
#sidebar a[href^="http:"], #sidebar a[href^="https:"],
a.noexternallink[href^="http:"], a.noexternallink[href^="https:"]
a[href^="/index.html"], a[href^=https://blog-well.com]
{
  background: none;
  padding-right: 0px;
}

Step 9: Review Padding Styles for Existing Links in Your Theme

A word or caution, as now links within the blog or Web Site will have a right padding of 0 pixels. If your theme explicitly sets the right padding for some items, then you will need to mark these settings as important which will ensure that value is used instead of the new value of 0 which is set in the above style sheet entries.

For example, BlogWell’s menu in the header, uses links which have a right padding of 20 pixels. So after adding the above entries to our theme’s style sheet, our menu appeared as:

The style entry which sets the menu’s right padding is:

#topnav ul li a
{
  padding-right: 20px;
}

CSS allows style sheet attributes to be marked as important, which means they will not be overridden by other style sheet entries. We can use the “!important” tag to ensure that the right padding of 20 pixels is used rather than it be overridden by the 0 pixel padding of our external link entries.

#topnav ul li a
{
  padding-right: 20px !important;
}

Our menu is now restored to its correct state:

Step 10: Review

To highlight external links within your blog or Web site do the following:

1) Copy external.gif to the images sub-folder of your current WordPress’ theme folder.

2) Add the following lines to your style sheet:

a[href^="http:"], a[href^="https:"]
{
  background: url(/page/9/images/external.gif) no-repeat right top;
  padding-right: 12px;
}
#header a[href^="http:"], #header a[href^="https:"],
#footer a[href^="http:"], #footer a[href^="https:"],
#sidebar a[href^="http:"], #sidebar a[href^="https:"],
a.noexternallink[href^="http:"], a.noexternallink[href^="https:"]
a[href^="/index.html"], a[href^=https://blog-well.com]
{
  background: none;
  padding-right: 0px;
}

3) Review your style sheet to see if any entries explicitly set the right padding value, in which case you may need to mark them with the “!important” tag.

A Final Word on Browsers

Should the link wrap around to a new line, Mozilla Firefox will display the external image correctly, following the end of the link on the new line.


However, Microsoft Internet Explorer will display the external image incorrectly at the end of the first line without any margin so it overlaps the text.


« Previous PageNext Page »