Archive for the 'Cool Tools' Category

Free loading/waiting animated gifs

Found this Web 2.0 site which creates animated gifs.

bar-circle.gifbig-flower.gifindicator-big-2.gifbig-roller.gifradar.gifcircling-ball.gifbouncing-ball.gif

(Excuse the borders around the images which is an issue with the WordPress theme)

You specify:

  • Style
  • Background color (any) or transparent
  • Foreground colour (any)

It calls itself the “ Ajax loading gif generator“; however, it is ironic that it doesn’t behave like an Ajax based Web 2.0 (is this redundant) Web site, since pages are reloade; nor does it remember the transparency setting.

Anyways, free, fun and useful - win, win all around.

Sphere: Related Content

Developer Toolbar for Microsoft Internet Explorer

Microsoft has released a developer toolbar for Microsoft Internet Explorer which may be useful to SEO folk for ad-hoc analysis of individual pages.

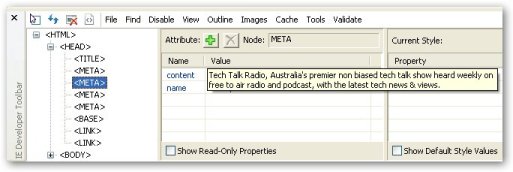
For example, it allows the details of the commonly used description and keywords meta tags without having to troll through the raw html source code.

Tooltips are used to allow the all of the content to be displayed. 

meta description tooltip
 
It is interesting to note that MS capitalize the tag names within the toolbar even though lowercase is the strict W3C definition.

A suggestion for MS with respect to visually distinguishing between the different meta tags is to include the name value within the navigation tree on the left hand side.  For example, instead of “<META>” you would see “<META name=’description’>”.

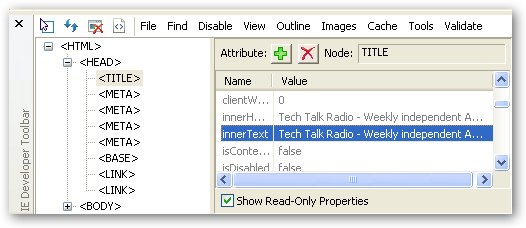
The other common SEO attribute is the title tag, but viewing the actual contents is confusing at first as nothing is shown when the title tag is viewed even though one is set.

To view the value of the title tag you need to use the innerText attribute of the tag, which is done by checking the “Show Read-Only Properties”.

title tag innerTag
 
Another suggestion for MS would be for the innerText attribute to always be displayed.

Without going into too much detail, there are a lot of interesting things you can do with the toolbar:

1. Easily resize Internet Explorer to 800×600, 1024×768 etc to see what your page looks like for the resolutions you want to support.
2. Easy access to W3C validation tools and link checker, and accessibility reports.
3. Ability to turn off CSS – which is interesting for no other purpose that to see how awful a page looks.
4. Table and div tags etc can be outlined on the screen.
5. You can change the class of a tag and see its effect immediately before you edit the change within the actual page file.  All other read-write attributes can be changed also.
6. The toolbar can annotate the tag to image sizes, link paths, etc.  For example, viewing link paths replaces the original text of:

Original page contents

With the following:

Page contents with show links
 
7. And lots more

Download, install and give it a spin.

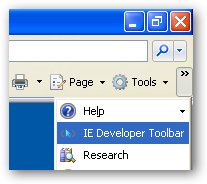
Displaying the toolbar is less than intuitive in my mind, which is done by selecting the >> to show additional items.

Show toolbar

Sphere: Related Content

Using WinSnap: Taking pictures of the screen

Frustrated with taking pictures of the screen using the standard PrntScrn and Alt-PrntScrn keys?

Ever tried to take a picture of the Alt-Tab open applications box? Check this out:

Alt-Tab dialog

What about those applications which don’t have straight line borders?

Any shape of application

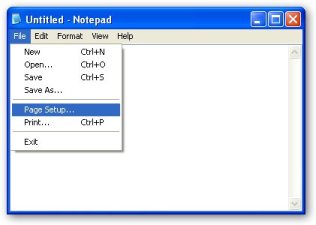
What about a picture of an application, and just the application, with the menus displayed? You can’t use Alt-PrntScrn as the Alt makes the menus disappear.

Notepad application with menu displayed

What about just the menu?

Notepad menu only

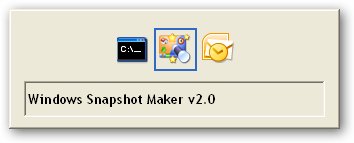
What about just some random region of the screen, without needing to use a picture editing application? The system tray:

System Tray

Or just the notification icons:

Notifications Icons

What about just a little piece of an application?

Minesweeper region

Well, all this is done by WinSnap, an application created by Alexander Avdonin, and you can check out information from his Web site at http://www.ntwind.com/.

And once you start using it, your documents and presentations will look more polished and you will think “how did I survive without it”.

Here is how each of the above was done:

• Alt-Tab open applications box – Region capture (Ctrl-Alt-PrintScreen) mode with 5 second delay to allow you to display the Alt-Tab open applications box and then select the top left and bottom right points of the region to be captured.
• Skinned application – Application capture (Ctrl-PrintScreen) mode.
• Notepad with menus - Application capture (Ctrl-PrintScreen) mode with 5 second delay to allow you to display the menu.
• Notepad menu – Menu capture (Win-Ctrl-PrintScreen) mode.
• System Tray – Object capture (Shift-Ctrl-PrintScreen) mode and select the system tray.
• Notification icons – Object capture (Shift-Ctrl-PrintScreen) mode and select the notification icons.
• Portion of Minesweeper – Region caption (Ctrl-Alt-PrintScreen) and select top left and bottom right points of the region to be captured.

Sphere: Related Content

Why does my site not appear in Google?

A common question, with a simple answer:

Google can only crawl and index Web sites that the Googlebot can see.

The very next question is: How do I know whether the Googlebot can see my site?

From Google’s Webmaster Guidelines*, pay particular attention to the first technical recommendation:

Use a text browser such as Lynx to examine your site, because most search engine spiders see your site much as Lynx would. If fancy features such as JavaScript, cookies, session IDs, frames, DHTML, or Flash keep you from seeing all of your site in a text browser, then search engine spiders may have trouble crawling your site.

Lynx is licensed as open source, which means that it is free.  You can either download Lynx v2.8.5, or if you don’t want the hassle of downloading and installing it, just use a Lynx viewer; you type in your URL and voila – it shows you what the Googlebot can see.

If you are a little more techie and want Lynx on your machine, Tech Republic have written a cheat sheet that includes 20 of the most useful Lynx keyboard shortcuts.

* Site owners: Don’t be put off by the title “Google Webmaster Guidelines” as they are not just for webmasters, they are for Web site owners too, and they are written in simple English.

If you have a site, whether you are in charge of it or contracting it out, you need to make sure it adheres to the basic guidelines; if it doesn’t, your site can be penalized by Google and the other search engines.  And, reading the guidelines is a lot simpler (and smarter) than trying to get your site back into Google once it has been penalized.

Related Stories:

Know what search engines hate and avoid the Google Death Penalty

What does the Googlebot see when it visits your site?

See your site through different browsers
 

Sphere: Related Content

Finding information on the Web: Visible vs. Invisible Web

The Internet is the first place most researchers turn to because of its sheer size and content; ironically, the size of the Internet is also the reason many researchers are slowly losing their minds.

Searching for information on the Web is a time sucker; you begin your search, look up at the clock and realize three hours have passed since you first hit the enter key. This is partly due to writers being a curious lot and going off on tangents; it is also due to reliable, useful, and relevant information being difficult to find. You don’t want to stop being curious, but you do want to start finding accurate information. To work out where to start your search, you need to know the difference between the Visible Web and the Invisible, or Deep Web.

The difference between the Visible Web and the Invisible Web

The Visible Web is made up of pages that search engine spiders can crawl and index. The Invisible Web is made up of pages that spiders cannot get into for various reasons; however, it is two to three times the size of the Visible Web. So if you think Google has a lot of information, just wait until you see this.

Where to begin the search

Before you start your search you need to decide where to search. You basically have three options; search engines, subject directories and the Invisible Web. Here is a brief description of each; you can find links to subject directories and Invisible Websites in the blogwell toolbox.

Search engines

Search engines like Google, Yahoo!, and Live have minimal human supervision; data is compiled by robots (a.k.a spiders and crawlers) that crawl the Web for information.

These are best if your topic is narrow; the more specific your search request, the more relevant the results.

Subject directories

Subject directories are organized into categories by people, not robots, so the quantity of information is not as great as that of search engines. However, depending on the directory, the information is generally of a higher quality than search engine results. *

Use subject directories if your topic is broad and you have the time to browse.

The Invisible Web

The Invisible Web is home to thousands of searchable databases that search engines cannot access. This is because these sites need some type of human interaction; you need to do something on the home page, that search engine spiders are incapable of doing.

For instance, to access the Lexis Nexis database, you need to type in a password, or to access the Librarians Internet Index you need to type in a search query (LII is both visible and invisible). Sadly, spiders are not quite bright enough to do this…yet.

You can find a list of my favorite subject directories and Invisible Web databases in the blogwell toolbox.

If you are interested in reading more about the Invisible Web, take a look at:

Invisible or Deep Web: What it is, Why it exists, How to find it, and its inherent ambiguity

Those Dark Hiding Places: The Invisible Web Revealed

Deep Web at Wikipedia

Sphere: Related Content

Bloggers: Take Control of Your Traffic

If you want a successful blog, you need traffic. If you want traffic you need to understand how search engines relate to you as well as your competitors.

Although many of these sites require that you have your own URL, e.g. blogwell.com instead of blogwell.wordpress.com, all of them offer lots of other useful information. Best of all – they are free.

Read more »

Sphere: Related Content
Two Useful Google Tools for Journalists

If you race around the Web, searching for information, getting sidetracked, and ultimately returning to the same tried and true sources, there are two easy-to-use tools that are brilliant at sorting stuff; getting it out of your head and moving it to the Web.

Google Personalized Homepage

Rather than clog your favorite’s folder with URL’s that you may only use a handful of times, personalized homepages allow you to categorize smarter. You have six tabs (which you name), and each allows you to add as much content as you wish.

If you don’t have a Google account, you need one.  If you have one, all you need to do is sign in and start adding stuff.

You can add content by looking through what’s on offer from ten categories, or add it by URL (next to the Google search box).  If the content you want to add is not off a feed, there is a Google bookmark module that you can add to your page, so just use that to add your favorite sites.

Google have been offering homepages for some time, but last month they overhauled it.  You can now personalize the page to suit your mood, and although you can only choose from six themes, it’s very cute because the pages are dynamic (meaning they change with your local time, season and weather conditions).  Read Jessica Ewing’s post about adding personality to your Google homepage.

Another feature for those among us that are a tad lazy is the option to let Google decide what sites may be of interest to you, based on the names you give tabs, or content you include.

Google Notebook

A brilliant tool, especially during the research phase when you don’t want to be writing down each URL you find, or adding them all to your favorites, is Google notebook, which allows you to copy bits off the Web easily. 

It also gets rid of the need to cut and paste between programs, time consuming and painful because you usually need to reformat text for ease of reading.  Google notebook lets you easily grab all the pertinent URL’s or text, so that later, when you do need to start writing; it’s all there in the one place, in a common format.

Sphere: Related Content

How to convert file formats the easy way

Converting files from one format to another can be tricky at the best of times. Media Convert is an online tool that is free to use, easy to use, and requires no software or registration. If it makes my life easier, I’m all for it, and this does.

I recently converted a .wav file, that I had on my PC, to an MP3 file, and within ten minutes I had my new format. Given the size of the file, I found the time it took was minimal. It is really easy to use and lets you to convert file formats from both a Web site and also your computer. You type in the URL, or browse through your harddrive to select the file you want to convert, then enter the new format, and voila. Within minutes, your new file is available to download.

A list of some of the files it allows you to convert:

Text and Documents: Microsoft Word, RTF, PDF, PS,HTML, Wordperfect, CSV, Excel, Lotus 123

Music: WAV, MP3, WMA, OGG, AAC, MP4

Image: AVS, BMP, GIF, JPEG, MIFF, PALM, PNG, TGA, TIFF

Movie: 3GP, AVI, GVI, MOV, MP4, OGM, RM, VOB

Archives: 7Z, BZ2, CAB, LHA, TAR, YZ1, ZIP

For a complete listing or to convert a file, go to Media - Convert.

Sphere: Related Content

Using w.bloggar for Wordpress blogs

If you want a tool that gives you more formatting features and an easier interface, or you just want the ability to write offline, w.bloggar is one of several Weblog clients that Wordpress supports. It is free to use, runs on your machine and uses XML-RPC to post to your blog.

Installing it was a little tricky; here are the steps:

1. Do you already have a blog?

This lets you configure w.bloggar to post to an existing blog, or if you dont have one, w.bloggar will help you set one up.

2. In which tool or service was your blog created?

You need to enter your blog software: mine is wordpress.

It then asks you for an account alias; a name w.bloggar will associate with this particular blog. As it is for your eyes only, call it anything you want. I went the simple route and gave it the name of my blog blogwell.

Step two also lets you set up w.bloggar to ping various sites (let them know) each time you post. EG technorati, bloglog.

3. Account connection settings

This was the tricky one for me, hopefully this configuration info will help you.

The first question is where is your blog hosted.

Mine is - blogwell.wordpress.com

If the blog was on my own Website, for instance www.lidija.com, the host would be www.lidija.com

Then it asks you for the full path to the API endpoint of your blog tool.

Mine is /xmlrpc.php. If you have a blog on wordpress, yours will be the same.

But, if your blog lives on your Website, for instance www.lidija.com/blogwell, the path would then be /blogwell/xmlrpc.php

The default port is set to 80, which you can leave or change for security by clicking the https button; this will automatically change the port to 443.

The next page asks for your login details and you’re done.

Voila!

Sphere: Related Content

See Your Site Through Different Browsers

Browsershots is a free online platform that allows you to see a screenshot of how your site looks in these browsers:

  • Linux: Firefox 1.5, Firefox 2.0, Konqueror 3.5, Opera 9.0
  • Mac: Safari 2.0
  • Windows: MSIE 5.0, MSIE 5.5, MSIE 6.0, MSIE 7.0
Sphere: Related Content

« Previous PageNext Page »