Archive for the 'Tech Tips' Category

Beginner’s Guide to FTP for WordPress

When you self host your own WordPress blog you have access to the most basic of WordPress functionality.

In order to get the same functionality, and more, for your blog as that provided by WordPress.com, you will need to install some of the many WordPress.org plugins.

We have written a beginner’s guide to FTP for WordPress (1.39 MB PDF) which will show you how to:

  • Configure FileZilla, an FTP client, to allow you to transfer files to and from your blog.
  • Download a plugin.
  • Install the plugin onto your blog using FileZilla.
  • Activate the plugin.

If you have never used an FTP client before, or don’t even know what FTP stands for, and fish transferring ponds it is not, this guide is for you.

Sphere: Related Content

22 IE Keyboard Shortcuts to Save You Time

Not long ago, we put together a basic list of Firefox keyboard shortcuts. Today, we thought we’d give you 22 useful and basic IE keyboard shortcuts to print up or bookmark.

  1. Select location bar: Alt+D
  2. Select search bar: Ctrl+E
  3. Open search result in new tab: Alt+Enter
  4. Full screen on/off: F11
  5. Go to your default homepage: Alt+Home
  6. Go back a page: Alt+Left Arrow or Backspace
  7. Go forward a page: Alt+Right Arrow, or Shift+Backspace
  8. Select an entire page: (ready to copy and paste) Ctrl+A
  9. Copy selected text: Ctrl+C
  10. Paste to new location: Ctrl+V
  11. Refresh page: F5
  12. Refresh page and cache: Ctrl+F5
  13. Stop downloading page: Esc
  14. Open New Tab: Ctrl+T
  15. Switch to next tab: Ctrl+Tab
  16. Switch to previous tab: Ctrl+Shift+Tab
  17. View Page Source: Alt+V+C
  18. Find specific words on a page: Ctrl+F
  19. Print Page: Ctrl+P
  20. Save Page: Ctrl+S
  21. Zoom in (Increase text size): Ctrl++
  22. Zoom out (Decrease text size): Ctrl+-

Photo Credit: ieteam

Sphere: Related Content

20 Firefox Keyboard Shortcuts To Save You Time

Print this up, bookmark it, or just remember this list of 20 useful and basic shortcuts.

  1. Select location bar: Ctrl/Cmd+L or Alt+D
  2. Select search bar: Ctrl/Cmd+K
  3. Go to your default homepage: Alt/Option+Home
  4. Go back a page: Alt/Cmd+Left Arrow or Backspace
  5. Go forward a page: Alt/Option+Right Arrow, or Shift+Backspace
  6. Select an entire page: (ready to copy and paste) Ctrl/Cmd+A
  7. Copy selected text: Ctrl/Cmd+C
  8. Paste to new location: Ctrl/Cmd+V
  9. Select specific text with keyboard: Turn carat browsing on (F7)
  10. Refresh/reload page: F5 or Ctrl/Cmd+R
  11. Open New Tab: Ctrl/Cmd+T
  12. Switch between tabs: Ctrl/Cmd+Tab
  13. Select tab by position: Ctrl/Cmd+position (1 - 9)
  14. View Page Source: Ctrl/Cmd+U
  15. Find specific words on a page: Ctrl/Cmd F to open Quick Find Box (bottom left of screen).
  16. Print Page: Ctrl/Cmd+P
  17. Save Page: Ctrl/Cmd+S
  18. Increase text size: Ctrl/Cmd++
  19. Decrease text size: Ctrl/Cmd+-
  20. Clear Private data: Ctrl/Cmd+Shift+Del
  21. Image Credit: Hack College

Sphere: Related Content

How To Display Ads In Your WordPress Sidebar

A lot of new bloggers want to include advertising on their site, but find the idea of adding an advertisement to their sidebar daunting. If your blog runs on WordPress software, it’s a simple matter of using your text widgets to show ads. In this post, we’ll show you how.

There are a number of WordPress themes readily available that support ads, and make managing them relatively easy and pain free (at least that’s what they say). But, no doubt, you have already invested time choosing and customizing/tweaking your current theme.

Rather than change designs now, a simple approach is to use the standard WordPress Text Widget to show image ads. Once you have had experience with displaying ads, you can then decide whether it is worth changing your theme to accommodate the ads.

What is an ad?

When you sign up for ads, typically via an affiliate program, you will be provided with a username and password which will allow you to login and select the ads you wish to run on your blog.

Nearly all affiliate programs will provide the HTML code that you need to add to your blog. All you will need to do is to copy this HTML code to the clipboard and then paste it into a text widget.

If we walk through an example, you’ll see it really is that simple.

For an image based ad, the HTML will be of the form:

<a href=”…”><img src=”…” /></a>

Where:

<a href=”…”>…</a>

Is the link which takes your reader to the Web site of the product/service being advertised.

and <img src=”…” />

Is the reference to the image to be displayed, which is taken from the affiliate program’s Web site. You will not need to upload any images to your blog.

I read Raymond Chen’s blog The Old New Thing. Now Raymond has written a book based on his blog, aptly called The Old New Thing, and has an image of the book on his blog, which is linked the book’s details on Amazon.

I will use this as an example, for which the HTML code is:

<a href=”http://www.amazon.com/gp/product/0321440307?ie=UTF8& tag=tholneth-20&linkCode=as2&camp=1789&creative=9325& creativeASIN=0321440307″><img border=”0″ src=”http://images.amazon.com/images/P/ 0321440307.01._AA_SCMZZZZZZZ_V33963393_.jpg” /></a>

NOTE: A few extra spaces have been added to the URL values so that they wrap nicely within this post - just so you know.

The URL has two parts. Everything up to the question mark i.e. http://www.amazon.com/gp/product/0321440307 - is the link to the book’s details on Amazon; everything after the question mark are name/value pairs which contain Raymond’s affiliate information and how to display the information about the book.

The URL to the book’s details is:

http://www.amazon.com/gp/product/0321440307?ie=UTF8& tag=tholneth-20&linkCode=as2&camp=1789&creative=9325& creativeASIN=0321440307

The URL to the image is:

http://images.amazon.com/images/P/ 0321440307.01._AA_SCMZZZZZZZ_V33963393_.jpg

How to put an image ad into a text widget

The simplest thing to do is to display one ad per text widget.

Within the Design - Widgets section of your WordPress Dashboard, add a new Text Widget.

  • Do not enter a title for the Text Widget (the single line edit box at the top).
  • Enter the ad’s HTML code into the main edit box of the text widget.
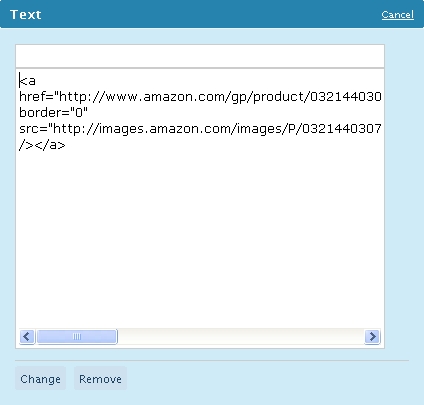
Saving the changes, will show the following within your blog:

To center the image within the text widget

To center the image within the text widget all you need do is, within Design - Theme Editor section of your WordPress Dashboard, add the following to your theme’s style sheet.

.textwidget { text-align: center; }

The text widget will now appear with the image centered.

One disadvantage of this approach is that all text widgets will be centered. So if you are using text widgets to display something other than ads which you do not need centered, then you will need to differentiate text widgets which display ads from those which don’t display ads.

You can do this by enclosing the ad’s HTML within a DIV tag as follows:

<div class=’ad’>…</div>

So the text widget now looks like this:
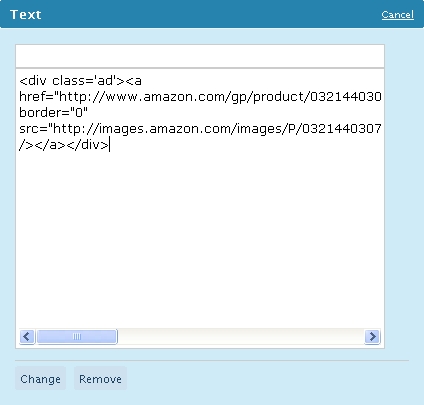
Within the theme’s style sheet add the following at the end:

.ad { text-align: center; }

How to include two ads per text widget

If you want to display two ads per text widget you will most likely want to center this both horizontally and vertically.

You do this by enclosing the HTML code for the two ads within the text widget as follows:

<table class=’ad’><tr><td>…</td><td>…</td></tr></table>

Replacing … with the HTML for the 2 ads required:
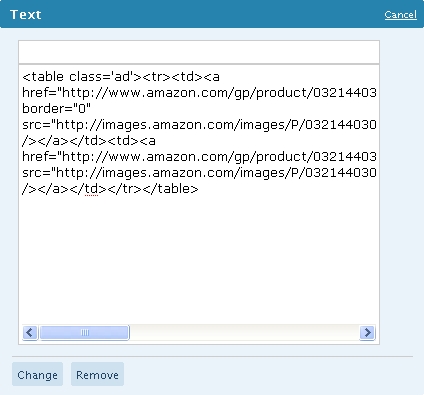
The ads will appear as follows:

You can force the ads to be aligned horizontally and vertically by adding the following to your theme’s style sheet:

.ad { width: 100% }
.ad tr td { text-align: center; vertical-align: middle; }

The ads will be aligned as follows:

Google and Advertising

Google’s PageRank flows from blogs and Web sites via links. This means your PageRank benefits when you receive links from sites with a higher PageRank, and sites you link to will benefit from your PageRank.

As a result, many sneaky webmasters began buying and selling links to manipulate search rankings. In an attempt to curb this practice, Google made the decision that all paid links should be disclosed.

The ads you are running are links, and since the advertisers are paying you to have the link on your blog, you must describe the ad links as “nofollow,” this tells Google to not consider the link for the purposes of calculating its PageRank. If you don’t abide by this rule, your blog will be penalized; it may even be removed from the search results.

Adding “nofollow” to ad links

The easiest way to disclose your link is by adding the text rel=”nofollow” to the link.

So the Amazon link to Raymond Chen’s book on Amazon becomes:

<a rel=”nofollow” href=”http://www.amazon.com/gp/product/0321440307?
ie=UTF8&tag=tholneth-20&linkCode=as2&camp=1789&creative=9325&
creativeASIN=0321440307″><img border=”0″ src=”http://images.amazon.com/images/P/
0321440307.01._AA_SCMZZZZZZZ_V33963393_.jpg” /></a>

You may need to add rel=”nofollow” to any HTML code you receive via affiliate programs.

Wikipedia has more information on nofollow.

Sphere: Related Content

Online Storage - MediaMax’s High Tech Extortion

extortion.jpg

Photo Credit: Golden Emporium (Thanks Kat)

You upload a file onto a free online storage site, but before you can download it, you have to pay. How would you feel? Very pissed off! And if that was the only copy of the file, well, words would either fail you or completely overflow you.

The folks at MediaMax think that such extortion is acceptable, much to the dissatisfaction of MediaMax users!

A bit of background.

We recently posted 100+ Resources for Web Developers on Blog Well which included 3 suggestions for Online Storage:

  1. Omnidrive (1GB storage - 5 GB bandwidth/month)
  2. Box (1GB storage - 10 GB bandwidth/month - 10MB file size)
  3. MediaMax (25GB storage - 1 GB bandwidth/month - 10MB file size)

Personally we have been using Box for well over a year now, and have found the service excellent. In including “Online Storage” in the category we researched a couple of alternatives, and came up with OmniDrive and MediaMax, both of which appeared to offer suitable solutions.

How wrong we were! Sandra alerted us to the issue with MediaMax via a comment on the post. Thank you Sandra.

So we thought we would review both of the alternatives we provided.

Omnidrive now no longer allows users to register. Their “Signup” buttons go to a page which doesn’t exist, which has been happening for well over a week now and I can’t believe that this is nothing other than deliberate. Registering via their Windows client takes you to a valid signup page; however, the section on selecting a plan is empty and continuing the signup process results in a processing error! So it looks like the folks at Omnidrive have taken their ball and gone home.

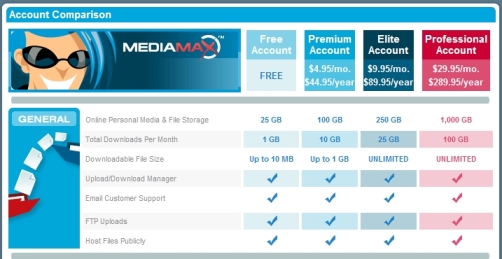
MediaMax on the other hand is alive and well. They offer comparatively a large storage limit of 25GB for a free account, and say that the “download” limit is 10MB per file and that you can “share” files up to 10MB in size.

Here are some screen shots of the information they provide:

mediamaxpricing.jpg

mediamaxfreeoffer.jpg

What they don’t say is the limit on the size of files for uploading, for which there is no actual limit, but which one would assume would be 10MB as well.

I uploaded a 17MB quite happily, and then attempted to download it, and this is what I got.

mediamaxdownloadlimit.jpg

So I have to pay a minimum of $4.95 to retrieve the file, or $9.95 if the file was larger than 1GB. Extortion at its finest.

From a legal perspective, MediaMax have done nothing illegal. From an Internet perspective, they should be shown the door.

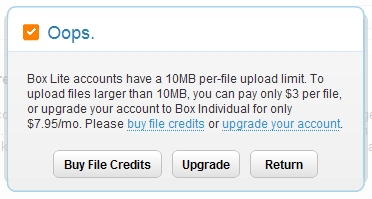
Can they blame the technology? If they dare! But, Box, which limits file uploads to a maximum of 10MB, displays a friendly message informing you that the free account limit has been exceeded and the file cannot be uploaded unless you pay per file or upgrade the account.

boxuploadlimit.jpg

Can they say that all other online storage providers do the same thing? With respect to bandwidth, they can; however, at the start of the next month, the file will be available to download, which is completely acceptable for a free offering.

So MediaMax, free all those files you have imprisoned and do what Box does or shut up shop and get off the Internet.

Finally, in reviewing other online storage offerings here are some notes on the ones we now include in the list, in no particular order:

Xdrive

  • 5GB free storage
  • AOL signup required - good for some, bad for the rest
  • Ads
  • Interface is quite good
  • Downloading via browser is quite clunky but I was able to upload and download a 14.8 MB file without issue.
  • Client application available.

humyo

  • 30 GB free storage - 25 GB media (phots/music/videos) and 5 GB non-media files
  • Files deleted if the account is not used within 90 days
  • Windows client available for performing backups.

Box

  • 1 GB free storage
  • 10 MB file size upload limit
  • 10 GB bandwidth/month
  • Sharing available

Orbitfiles

  • 6GB free storage
  • 100 MB file size upload limit
  • 20 GB bandwidth/month
  • Good feedback when uploading
  • Sharing available
  • Able to ZIP a previously uploaded file - cool feature
  • Upload limit enforced - although error message display (floats at top) is not obvious at times

Caution: Down the right hand side of the home page they show the latest images uploaded, which may not be appropriate for some, and have not changed within the last 24 hours.

Gigasize

  • Unlimited free storage
  • 600 MB file size upload limit
  • Files deleted after 45 days
  • Waiting time before download begins is imposed (removed for premium (paid) account)
  • Unspecified download limits

DropBoks

  • 1GB free storage
  • 50 MB file size upload limit
  • Sharing is coming soon

There are a lot of free online storage offerings available, but with free you “get what you pay for”. So I would treat files uploaded as dispensable, in that they may be deleted, either due to the provider negligence (server crash, insufficient backups etc) or going out of business. Back them up on DVD’s or a backup hard disk, and use free online storage offerings as a convenient way to access your data, especially when you are out of the office or away from home.

Rather than use an explicit online storage offerings, the following suggestions make use of free storage which is packaged for a specific purpose.

Google’s Gmail

Use the GSpace FireFox extension which allows the Gmail 2MB of storage to be used as one would any online storage offering.

There is also a GMail Drive Shell Extension, which allows access to the GMail 2GB of storage from within Windows Explorer, so you can drop and drag files to/from your local disks. However, I would not recommend it as it crashed on, which kills the explorer.exe process, which is responsible for providing the Windows Taskbar, and this disappears!

WordPress.com

WordPress.com provides 3GB of storage per blog.

So create a private blog and create posts which contain your uploaded files.

With the names of Google and Automattic behind them, it does give a certain piece of mind with respect to continuity of service.

If you know of any others, or good/bad experiences, please leave a comment.

Sphere: Related Content

Next Page »